What are ACLs?
ACLs are a set of rules used most commonly to filter network traffic. They are used on network devices with packet filtering capatibilites (e.g. routers or firewalls). ACLs are applied on the interface basis to packets leaving or entering an interface.
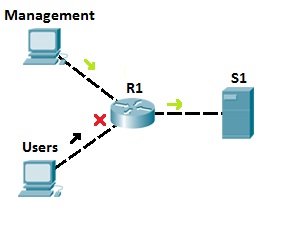
For example on how ACLs are used, consider the following network topology:

Let’s say that server S1 holds some important documents that need to be available only to the company’s management. We could configure an access list on R1 to enable access to S1 only to users from the management network. All other traffic going to S1 will be blocked. This way, we can ensure that only authorized user can access the sensitive files on S1.
Types of ACLs
There are two types of access lists:
1. standard access lists – with standard access lists, you can filter only on the source IP address of a packet. These types of access list are not as powerful as extended access lists, but they are less processor intensive for the router.
The following example describes the way in which standard access lists can be used.

Let’s say that server S1 holds some important documents that need to be available only to company’s management. We could configure an access list on R1 to enable access to S1 only to users from the management network. All other traffic going to S1 will be blocked. This way, we can ensure that only authorized user can access sensitive files on S1.
2. extended access lists – with extended access lists, you can be more precise in your filtering. You can evaluate the source and destination IP addresses, type of layer 3 protocol, source and destination port, etc. Extended access lists are more complex to configure and consume more CPU time than the standard access lists, but they allow a much more granular level of control.
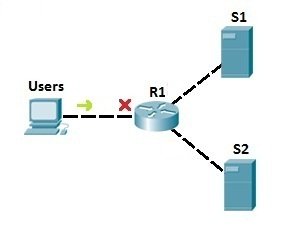
To demonstrate the usefulness of extended ACLs, we will use the following example.

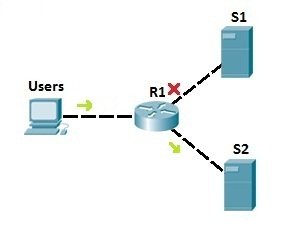
In the example network above, we have used the standard access list to prevent all users to access server S1. But, with that configuration, we have also disable access to S2! To be more specific, we can use extended access lists. Let’s say that we need to prevent users from accessing server S1. We could place an extended access list on R1 to prevent users only from accessing S1 (we would use an access list to filter the traffic according to the destination IP address). That way, no other traffic is forbidden, and users can still access the other server, S2:

Configuring standard ACLs
To create an standard access list on a Cisco router, the following command is used from the router’s global configuration mode:
R1(config)# access-list ACL_NUMBER permit|deny IP_ADDRESS WILDCARD_MASK
NOTE
ACL number for the standard ACLs has to be between 1–99 and 1300–1999.
You can also use the host keyword to specify the host you want to permit or deny:
R1(config)# access-list ACL_NUMBER permit|deny host IP_ADDRESS
Once the access list is created, it needs to be applied to an interface. You do that by using the ip access-group ACL_NUMBER in|out interface subcommand. in and out keywords specify in which direction you are activating the ACL. in means that ACL is applied to the traffic coming into the interface, while the out keyword means that the ACL is applied to the traffic leaving the interface.
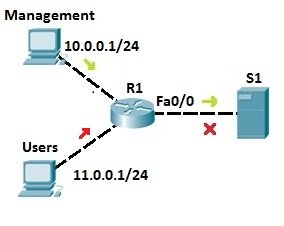
Consider the following network topology:

We want to allow traffic from the management LAN to the server S1. First, we need to write an ACL to permit traffic from LAN 10.0.0.0/24 to S1. We can use the following command on R1:
R1(config)#access-list 1 permit 10.0.0.0 0.0.0.255
The command above permits traffic from all IP addresses that begin with 10.0.0. We could also target the specific host by using the host keyword:
R1(config)#access-list 1 permit host 10.0.0.1
The command above permits traffic only from the host with the IP address of 10.0.0.1.
Next, we will deny traffic from the Users LAN (11.0.0.0/24):
R1(config)#access-list 1 deny 11.0.0.0 0.0.0.255
Next, we need to apply the access list to an interface. It is recommended to place the standard access lists as close to the destination as possible. In our case, this is the Fa0/0 interface on R1. Since we want to evaluate all packets trying to exit out Fa0/0, we will specify the outbound direction with the out keyword:
R1(config-if)#ip access-group 1 out
NOTE
At the end of each ACL there is an implicit deny all statement. This means that all traffic not specified in earlier ACL statements will be forbidden, so the second ACL statement (access-list 1 deny 11.0.0.0 0.0.0.255) wasn’t even necessary.
Configuring extended ACLs
To be more precise when matching a certain network traffic, extended access lists are used. Extended access lists are more difficult to configure and require more processor time than the standard access lists, but they enable a much more granular level of control.
With extended access lists, you can evaluate additional packet information, such as:
- source and destination IP address
- type of TCP/IP protocol (TCP, UDP, IP…)
- source and destination port numbers
Two steps are required to configure an extended access list:
1. configure an extended access list using the following command:
(config) access list NUMBER permit|deny IP_PROTOCOL SOURCE_ADDRESS WILDCARD_MASK [PROTOCOL_INFORMATION] DESTINATION_ADDRESS WILDCARD_MASK PROTOCOL_INFORMATION
2. apply an access list to an interface using the following command:
(config) ip access-group ACL_NUMBER in | out
NOTE
Extended access lists numbers are in ranges from 100 to 199 and from 2000 to 2699. You should always place extended ACLs as close to the source of the packets that are being evaluated as possible.
To better understand the concept of extended access lists, consider the following example:

We want to enable the administrator’s workstation (10.0.0.1/24) unrestricted access to Server (192.168.0.1/24). We will also deny any type of access to Server from the user’s workstation (10.0.0.2/24).
First, we’ll create a statement that will permit the administrator’s workstation access to Server:

Next, we need to create a statement that will deny the user’s workstation access to Server:

Lastly, we need to apply the access list to the Fa0/0 interface on R1:

This will force the router to evaluate all packets entering Fa0/0. If the administrator tries to access Server, the traffic will be allowed, because of the first statement. However, if the User tries to access Server, the traffic will be forbidden because of the second ACL statement.NOTE
At the end of each access list, there is an explicit deny all statements, so the second ACL statement wasn’t really necessary. After applying an access list, every traffic not explicitly permitted will be denied.
What if we need to allow traffic to Server only for certain services? For example, let’s say that Server was a web server and users should be able to access the web pages stored on it. We can allow traffic to Server only to certain ports (in this case, port 80), and deny any other type of traffic. Consider the following example:

On the right side, we have a Server that serves as a web server, listening on port 80. We need to permit User to access web sites on S1 (port 80), but we also need to deny other type of access.
First, we need to allow traffic from User to the Server port of 80. We can do that using the following command:

By using the tcp keyword, we can filter packets by the source and destination ports. In the example above, we have permitted traffic from 10.0.0.2 (User’s workstation) to 192.168.0.1 (Server) on port 80. The last part of the statement, eq 80, specifies the destination port of 80.
Since at the end of each access list there is an implicit deny all statement, we don’t need to define any more statement. After applying an access list, every traffic not originating from 10.0.0.2 and going to 192.168.0.1, port 80 will be denied.
We need to apply the access list to the interface:

We can verify whether our configuration was successful by trying to access Server from the User’s workstation using different methods. For example, the ping will fail:

Telnetting to the port 21 will fail:

However, we will be able to access Server on port 80 using our browser:

Configuring named ACLs
Just like the numbered ACLs we’ve used so far, named ACLs allow you to filter network traffic according to various criteria. However, they have the following benefits over numbered ACLs:
- an ALC can be assigned a meaningful name (e.g. filter_traffic_to_server)
- ACL subcommands are used in the ACL configuration mode, and not in the global configuration mode as with numbered ACLs
- you can reorder statements in a named access-list using sequence numbers
NOTE
Just like numbered ACLs, named ACLs can be of two types: standard and extended.
The named ACL name and type is defined using the following syntax:
(config) ip access-list STANDARD|EXTENDED NAME
The command above moves you to the ACL configuration mode, where you can configure the permit and deny statements. Just like with numbered ACLs, named ACLs ends with the implicit deny statement, so any traffic not explicitly permitted will be forbidden.
We will use the following network in our configuration example:

We want to deny the user’s workstation (10.0.0.2/24) any type of access to the Domain server (192.168.0.1/24). We also want to enable the user unrestricted access to the File share (192.168.0.2/24).
First, we will create and name our ACL:
R1(config)#ip access-list extended allow_traffic_fileshare
Once inside the ACL config mode, we need to create a statement that will deny the user’s workstation access to the Domain server:
R1(config-ext-nacl)#20 deny ip 10.0.0.2 0.0.0.0 192.168.0.1 0.0.0.0
The number 20 represents the line in which we want to place this entry in the ACL. This allows us to reorder statements later if needed.
Now, we will execute a statement that will permit the workstation access to the File share:
R1(config-ext-nacl)#50 permit ip 10.0.0.2 0.0.0.0 192.168.0.2 0.0.0.0
Lastly, we need to apply the access list to the Gi0/0 interface on R1:
R1(config)#int Gi0/0
R1(config-if)#ip access-group allow_traffic_fileshare in
The commands above will force the router to evaluate all packets trying to enter Gi0/0. If the workstation tries to access the Domain server, the traffic will be forbidden because of the first ACL statement. However. if the user tries to access the File server, the traffic will be allowed, because of the second statement.
Our named ACL configuration looks like this:
R1#show ip access-lists
Extended IP access list allow_traffic_fileshare
    20 deny ip host 10.0.0.2 host 192.168.0.1
    50 permit ip host 10.0.0.2 host 192.168.0.2
Notice the sequence number at the beginning of each entry. If we need to stick a new entry between these two entries, we can do that by specifying a sequence number in the range between 20 and 50. If we don’t specify the sequence number, the entry will be added to the bottom of the list.
We can use the ping command on the workstation to verify the traffic is being blocked properly:
C:\>ping 192.168.0.1

Pinging 192.168.0.1 with 32 bytes of data:

Reply from 10.0.0.1: Destination host unreachable.
Reply from 10.0.0.1: Destination host unreachable.
Reply from 10.0.0.1: Destination host unreachable.
Reply from 10.0.0.1: Destination host unreachable.

Ping statistics for 192.168.0.1:
    Packets: Sent = 4, Received = 0, Lost = 4 (100% loss),

C:\>

C:\>ping 192.168.0.2

Pinging 192.168.0.2 with 32 bytes of data:

Reply from 192.168.0.2: bytes=32 time<1ms TTL=127
Reply from 192.168.0.2: bytes=32 time<1ms TTL=127
Reply from 192.168.0.2: bytes=32 time<1ms TTL=127
Reply from 192.168.0.2: bytes=32 time<1ms TTL=127

Ping statistics for 192.168.0.2:
    Packets: Sent = 4, Received = 4, Lost = 0 (0% loss),
Approximate round trip times in milli-seconds:
    Minimum = 0ms, Maximum = 0ms, Average = 0ms
As you can see from the ping output above, the traffic is being filtered properly.